
How to Modernize Historic Homes Without Losing Character
How to Modernize Historic Homes Without Losing Character
Modernizing a historic home means upgrading systems like plumbing, electrical, and HVAC while preserving original features such as millwork, windows, and flooring. The goal is to make your home functional without compromising its charm. Here's how to approach it:
- Research Your Home's History: Identify its architectural style and era using physical details, public records, and resources like Sanborn Fire Insurance Maps. This helps guide decisions on what to preserve.
- Inspect and Plan: Hire professionals to assess structural issues, outdated systems, and preservation rules. Check for tax credits or grants if your home qualifies.
- Preserve Key Features: Protect original elements like woodwork, fireplaces, and vintage hardware. Restore rather than replace wherever possible.
- Modernize Thoughtfully: Focus updates on secondary spaces like basements, additions, or follow bathroom remodeling best practices. Use discreet methods to upgrade systems, such as running wiring through existing cavities or using ductless HVAC.
- Blend Old and New: In contemporary kitchen renovations and bathrooms, retain period details while adding modern conveniences. Use custom materials to match the craftsmanship of the original design.
- Work with Experts: Choose contractors experienced in historic properties to handle updates with care and navigate regulations.
5-Step Process for Modernizing Historic Homes While Preserving Character
Restoring a 113-Year-Old Craftsman Bungalow | Restored | Full Episode
If you're inspired by this restoration, consider how professional home remodeling can help you achieve similar results while maintaining your property's unique charm.
sbb-itb-8935015
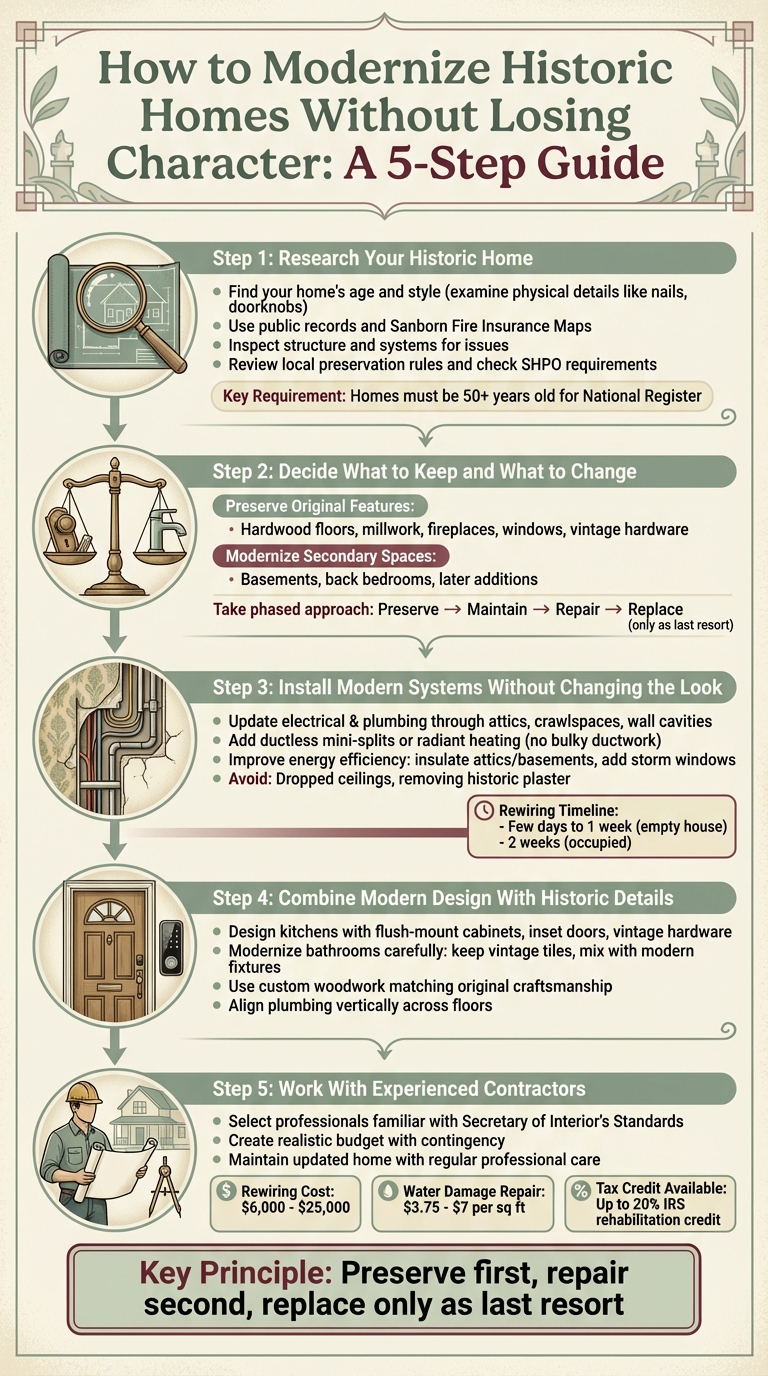
Step 1: Research Your Historic Home
Before diving into any restoration work, take the time to explore your home's history. A solid understanding of its past will guide decisions about which features to keep and which systems to upgrade, helping you avoid expensive missteps.
Find Out Your Home's Age and Style
Start by examining your home for physical details that hint at its age. Look at items like toilet tank lids, furnace plates, doorknobs, and nails. For example, machine-cut nails suggest 19th-century construction, while round wire nails point to a later period.
"Start by looking at your house to see what you can narrow down in terms of the era that your house was built in based on its style." - Elizabeth Finkelstein, Historic Preservationist
Pinpointing your home's architectural style can further narrow down its timeline. For instance, Queen Anne Victorians were popular from the 1880s to 1910s, while Craftsman bungalows emerged between the 1910s and 1930s. Reference books like The Field Guide to American Houses by Virginia Savage McAlester can help you match specific features to the correct architectural period.
Don’t overlook public records as a resource. Your county auditor or recorder's office can provide land records detailing previous owners and tax history. Additionally, the Library of Congress offers access to Sanborn Fire Insurance Maps, which date back to 1867. These maps show building footprints and materials. For example, if your house appears on an 1890 map but not on an 1884 map, it’s likely built within that six-year span. For particularly tricky cases, consider hiring an architectural historian.
Once you’ve established your home’s era and style, the next step is a professional structural assessment.
Inspect the Structure and Systems
Before making any plans, have professionals conduct a detailed structural inspection. They’ll look for issues like settlement problems, sagging beams, or even seismic vulnerabilities. Inspectors can also identify damage caused by earlier renovations, such as structural members altered to fit pipes and ducts. Additionally, they’ll determine whether wooden floor joists can support modern appliances.
Moisture-related damage and environmental wear are other critical areas to investigate. Inspect behind dropped ceilings for hidden gems like original ornamental cornices. You can explore our work to see how similar historic features have been integrated into modern renovations. You’ll also need to evaluate how much work is required to bring electrical, plumbing, and heating systems up to modern safety standards.
Review Local Preservation Rules
Once you’ve pieced together your home’s history, check local records and preservation regulations. Early in the process, reach out to your State Historic Preservation Office (SHPO). They can help you identify which architectural features need to be preserved and determine if your home qualifies for tax credits or grants. Generally, homes must be at least 50 years old to be eligible for the National Register of Historic Places.
"Modernizing should be done in a way that respects the home's integrity, using resources like the Secretary of the Interior's Standards for Rehabilitation." - Christopher Merritt, Utah State Historic Preservation Office
Understanding these rules is essential to prevent irreversible damage. For instance, using the wrong technique for brick repointing can permanently harm historic materials. Your SHPO can also connect you with professionals skilled in balancing modern updates with historical preservation. If you’re applying for federal tax credits or grants, you’ll be required to follow the Secretary of the Interior's Standards for Rehabilitation, as outlined in federal regulations (36 CFR Part 68).
Step 2: Decide What to Keep and What to Change
Once you've delved into your home's history and reviewed any relevant Orlando permit rules, it's time to decide which features to safeguard and which areas to refresh. This step involves carefully identifying the elements that make your home historically significant and planning updates that respect its legacy.
Preserve Original Character Features
Start by identifying the defining elements of your home and make it a priority to protect them. These could include original hardwood floors like heart pine, intricate crown molding, ceiling medallions, wainscoting, staircases, fireplaces, sash windows, antique doors, and vintage hardware such as knobs and hinges.
"Fireplaces, millwork, staircases, hardwood floors, and interior brick... are the heartbeats of your home's history, and preserving these elements will enhance the overall elegance of your space."
– Audrey Scheck, Interior Designer
Whenever possible, opt for restoration over replacement. Even features that may seem out-of-date can become standout details. For example, original windows with antique glass not only add character but also diffuse light in a way modern alternatives can't replicate. Instead of replacing them, consider restoring the wood and adding interior storm inserts to improve energy efficiency. Even small original elements can be invaluable for future repairs or custom touches, helping to maintain your home's unique story.
Modernize Secondary Spaces
Focus updates on secondary spaces that don't define your home's historic character. Areas like basements, back bedrooms, later additions, or other less visible sections are ideal for incorporating modern conveniences without impacting the architectural integrity of the main living spaces. By prioritizing upgrades in these areas, you can enhance functionality while preserving the home's key features.
When renovating kitchens or bathrooms, consider aligning them vertically across floors. This approach minimizes disruption to original walls and simplifies plumbing work. The goal is to modernize in a way that complements, rather than competes with, the home's historic charm.
"The goal is to identify the character-defining elements - original millwork, vintage hardware, how light moves through old glass - and protect those. Then, integrate modern comforts in ways that feel quiet and compatible, not competitive."
– Kate Wood, Worth Preserving
Take a Phased Approach
A phased approach to renovation helps ensure that historical integrity remains intact. Start by identifying and preserving the features that define your home's character. Next, maintain and protect these elements, repair any damage, and only replace items when repair is not feasible, either technically or economically.
Address maintenance issues promptly to avoid costly restorations down the road. Additionally, evaluate any previous alterations carefully. High-quality additions that have gained historical value should be preserved, while poorly executed modern changes can often be removed. This step-by-step strategy allows for the seamless integration of modern systems without compromising the home's historical essence.
Step 3: Install Modern Systems Without Changing the Look
Upgrading the electrical, plumbing, and HVAC systems in a historic home can feel like walking a tightrope. You want modern convenience, but not at the expense of the home’s charm. The trick? Use the existing structure to make updates as discreet as possible. This way, you preserve the beauty of the past while enjoying the comforts of today.
Update Electrical and Plumbing
Bringing your home’s wiring and plumbing up to date doesn’t have to mean tearing into walls or damaging original features. Instead, electricians and plumbers can use attics, crawlspaces, basements, and wall cavities to run new cables, pipes, and ducts. In many cases, they can thread new wiring through existing openings, reducing the need to cut into plaster or drywall.
When vertical runs are necessary, keep them in out-of-the-way spots like closets or service areas to protect decorative spaces. If pipes or conduits must be visible, choose the smallest possible diameter and paint them to match the surrounding finishes. Avoid attaching anything directly to decorative plaster, ceiling medallions, or ornate woodwork to maintain the home’s character.
"The visible decorative features of historic mechanical systems such as grilles, lighting fixtures, and ornamental switchplates may contribute to the overall historic character of the building and should thus be retained and repaired, whenever possible."
– National Park Service
Experts suggest rewiring a house about every 25 years to reduce fire risks and improve efficiency. If the house is empty, this process can take just a few days to a week. For homes that are occupied during the upgrade, expect it to take closer to two weeks.
Add Heating and Cooling
Heating and cooling upgrades can be tricky in historic homes, but there are options that won’t disrupt the original design. Systems like ductless mini-splits, small-duct HVAC, and radiant heating are excellent choices because they don’t require bulky ductwork that could damage walls or ceilings.
"Select a mechanical system that will require the least intrusion into the building's historic fabric and that can be updated or altered without major intervention into the wall and floor systems."
– National Park Service
If your home already has radiators or decorative grilles, consider upgrading the functional components - like boilers or compressors - while leaving the visible elements intact. For new ducts, prioritize running them through closets or service areas. If ducts must be exposed in finished spaces, place them thoughtfully and paint them to blend in. Avoid installing dropped acoustical ceilings, as they can ruin the proportions of a room and diminish its character.
Before installing any new system, it’s a good idea to conduct an energy audit. Tests like blower door assessments or infrared thermography can help ensure the equipment is properly sized, which prevents excess moisture that could harm historic materials. Once the new systems are in place, they’ll provide modern comfort without overshadowing the home’s historic details. For more information on our process, see our remodeling FAQs.
Improve Energy Efficiency
Historic homes often have built-in features like shutters, transoms, and porches that naturally help conserve energy. Use these passive elements to your advantage, and focus on improving the building envelope - insulating attics, basements, and crawlspaces - to boost efficiency without altering key living spaces.
For windows, maintain the original look by adding weatherstripping, caulking, or storm windows instead of replacing multi-paned sashes. Interior storm inserts are particularly effective, as they preserve the exterior appearance while cutting down on heat loss. Start by sealing air leaks with minimally invasive methods before considering wall insulation, which can damage historic plaster.
| Upgrade Category | Recommended Approach | Avoid |
|---|---|---|
| Insulation | Add insulation in attics, basements, and crawlspaces | Removing historic plaster to install wall insulation |
| Windows | Use weatherstripping and storm windows | Replacing historic sashes with thermal sashes or false muntins |
| HVAC | Conceal ducts in closets or wall cavities | Installing dropped acoustical ceilings or through-the-wall AC units |
If you’re exploring renewable energy options like solar panels or geothermal heat pumps, make sure they’re installed in less visible areas, such as secondary elevations or hidden roof slopes, to maintain the home’s historic appearance. Lastly, have a professional commission your HVAC system to confirm it’s installed correctly and running efficiently.
Step 4: Combine Modern Design With Historic Details
Once you've upgraded the essential systems, it's time to turn your attention to blending modern convenience with the timeless charm of your historic home. Spaces like kitchens, bathrooms, and living areas should meet the demands of today’s lifestyle while still feeling like they belong to the home’s original era. The trick? Achieving a seamless balance between the old and the new so that the design feels deliberate and harmonious.
Design Kitchens That Match the Era
A well-designed kitchen can honor the past while embracing modern functionality. Opt for flush-mount cabinets with inset doors and vintage-inspired hardware to echo the look of antique hutches while accommodating today’s storage needs. If your home has original ceiling joists, exposing them can add warmth and create a stunning connection between historic architecture and contemporary design.
"In kitchens, I often use flush-mount cabinets with inset doors and vintage-style hardware to mimic early hutches."
– Jeremy Rosier, Owner, Rosier Restorations
For instance, a renovation of a Queen Anne-style home from the 1890s in Evanston preserved a key window feature by carefully repositioning modern appliances and replicating period details to maintain continuity.
When reconfiguring the kitchen layout, try to keep the home's original proportions intact. Instead of removing entire walls, consider widening doorways to create a sense of openness. If you need to brighten the space, two-sided glass cabinets can increase light flow without sacrificing storage. Modern solutions like walk-in pantries and "zoned layouts" - where items are stored near their point of use - can make even older kitchen footprints more practical.
Modernize Bathrooms Carefully
Bathrooms require a more delicate approach, as they often feature original details worth preserving. Look for elements like vintage tiles, decorative moldings, or classic cabinetry that can be retained and paired with modern updates. By mixing these historic features with contemporary fixtures, you can create a space that feels both functional and true to its roots.
"When I update kitchens and bathrooms, I avoid doing a full overhaul unless necessary. Instead, I'll keep charming elements like vintage tiles or classic cabinetry and mix them with modern countertops, faucets, or appliances."
– Kanika B. Khurana, Principal Interior Designer and Founder, Kanika Design
If renovating multiple bathrooms, align the plumbing vertically across floors to simplify installation and minimize disruption to the home’s structure. For lighting, consider restoring original fixtures or choosing new ones with a vintage flair - brass finishes, Edison bulbs, or period-appropriate sconces can add character. Layer lighting with a mix of overhead pendants and wall sconces to highlight architectural details and create depth.
Stick to soft, neutral color palettes to allow vintage details to shine. In smaller spaces like powder rooms, bold wallpaper with botanical or celestial themes can add personality without overwhelming the space. If you're incorporating smart technology, keep it subtle - use switches designed to look traditional or hide modern devices like speakers within existing shelving.
With kitchens and bathrooms thoughtfully updated, the next step is ensuring that new additions reflect the craftsmanship of the original design.
Use Custom Woodwork and Materials
To maintain a cohesive look, new elements should replicate the craftsmanship of the home's original details. Custom millwork - like trim, moldings, and cabinetry - should match existing designs as closely as possible. If original hardware is missing, opt for vintage-style replicas or high-quality antique pieces to retain the tactile charm of doors and cabinets.
Many successful projects have used reclaimed materials and custom millwork to seamlessly integrate modern amenities without compromising the home’s historic character.
When restoring original floors, choose flat, "invisible" finishes that protect the wood while preserving its historic appearance. For added comfort, radiant heating can often be installed beneath antique floorboards without causing damage, giving you the best of both worlds.
"Keep the architectural details that define the home - original wood paneling, heritage moldings, sash windows - and build around them with contemporary pieces that enrich, not compete."
– Nick Smith, Founder, Smithers
If you’re adding new space to your home, consider using modern materials or slightly offsetting wall and roof lines to distinguish the addition from the original structure. This approach aligns with the Secretary of the Interior's Standards, which recommend that new work complement the size, scale, and features of the historic property while remaining clearly differentiated to avoid creating a false sense of history.
Step 5: Work With Experienced Contractors
After laying the groundwork with research and updates, the next step is finding contractors who can balance modern upgrades with preserving your home's unique charm. The right professionals will understand both the technical demands of older homes and the importance of maintaining their historical character.
Select the Right Professionals
Seek out contractors who are familiar with the Secretary of the Interior's Standards for the Treatment of Historic Properties. These guidelines cover preservation, rehabilitation, restoration, and reconstruction and are essential for maintaining the integrity of historic homes. A contractor with expertise in your home's architectural style - whether it's Victorian, Colonial, or Mid-Century - will have a deeper understanding of features like millwork, plaster techniques, and other details that make your home distinctive. Make sure they are licensed and experienced in working with historic materials.
Your contractor should also excel at "invisible" modernization. This means integrating modern systems like HVAC, plumbing, or electrical wiring in a way that doesn't disrupt the home's original aesthetics. If your property is located in a historic district, it's crucial to find contractors who have experience navigating local regulations and working with historic commissions or State Historic Preservation Offices to secure necessary permits.
For example, homeowners in Central Florida can consider Gomez Contractors. With over 25 years of experience, they offer licensed and insured services, including dedicated project managers to help navigate the complexities of restoring historic homes.
To find reliable professionals, reach out to local historical societies, museums, or your State Historic Preservation Office. Also, ensure any contractor is certified in lead paint safety, as homes built before 1978 often contain lead-based materials that require special handling.
With a skilled team in place, the next step is to plan your budget and timeline.
Create a Budget and Timeline
Renovating a historic home often comes with surprises, so it's important to set a realistic budget that includes a contingency for unexpected issues. For instance, rewiring a historic home can range from $6,000 to $25,000, while repairing water damage might cost $3.75 to $7 per square foot. Develop clear contracts and a logical project sequence to avoid delays or confusion.
Start with a professional inspection to identify structural problems versus cosmetic ones. Also, account for the time needed to get design review board approvals and building permits. Keep in mind that most permits are valid for only 12 months. To offset some costs, check if your project qualifies for the IRS rehabilitation tax credit, which offers up to 20% credit for certain historic renovations.
"Before starting any renovation, we walked through our historic home multiple times to understand how people would actually move through the space. We didn't demo a thing until we had that clarity." – Mary Smalling, Owner, Banks Bed and Breakfast
Once your budget and timeline are set, focus on planning for the long-term care of your updated home.
Maintain Your Updated Home
After completing your renovations, regular maintenance is essential to protect both the historic features and the modern updates. Address leaks or damages as soon as they occur, and always hire licensed professionals who are skilled in the necessary trades.
"One of the best ways to preserve a historic home is to stay on top of maintenance. Leaks and damages should be addressed immediately - and always by licensed professionals skilled in the proper trades." – Joseph Marraccino, J&R Restoration
Stick to a maintenance schedule for wood, masonry, and mechanical systems to keep your home in great shape. Document all repairs and updates to make future upkeep easier and to preserve the home's history for years to come.
Conclusion
Updating a historic home is all about striking the right balance - honoring its unique charm while making it livable for today. Preserve those standout features like original millwork, vintage hardware, fireplaces, and hardwood floors, but don’t shy away from modernizing the systems behind the scenes. As interior designer Audrey Scheck wisely states, "Keep the character - that's where the magic is".
Take the time to research your home’s architectural style and approach renovations with a clear plan: retain and protect first, repair where needed, and only replace as a last resort. Start with the essentials - upgrading electrical, plumbing, and HVAC systems - before moving on to more visible updates like kitchens and bathrooms. When designing these spaces, aim for choices that respect the home’s original era.
Once your plan is set, it’s time to bring in the experts. Work with professionals who follow the Secretary of the Interior's Standards to ensure your updates are both sensitive and skillfully executed. For homeowners in Central Florida, Gomez Contractors is a trusted choice, offering experienced project managers to guide you through every step of the process.
FAQs
How do I decide which features of my historic home to preserve?
Start by making a list of standout features in your home that define its character. Pay attention to elements like original crown molding, hardwood floors, vintage tile, stained-glass windows, or intricate millwork. If you have access to historic photos or blueprints, use them to verify the authenticity of these details.
Once you've identified these features, assess each one using three key criteria: historical importance (does it represent the era or architectural style of the home?), architectural rarity (is it uncommon or particularly special?), and current condition (can it be restored instead of replaced?). If a feature is too damaged or poses safety concerns, consider upgrading it in a way that replicates its original design, preserving the home’s unique charm.
For a more thorough evaluation, consulting a professional - like those at Gomez Contractors - can be invaluable. They can help pinpoint which elements to preserve and craft a renovation plan that balances modern needs with your home’s historic appeal.
What modern upgrades can I add to a historic home without compromising its charm?
To bring a historic home into the present without losing its charm, start with energy-efficient HVAC options like ductless mini-splits. These systems provide modern comfort while requiring minimal alterations to the building's structure. Next, update the home’s functionality by installing modern electrical wiring and integrating smart lighting systems. To maintain the home’s character, keep original fixtures and decorative details intact whenever possible. These thoughtful upgrades balance comfort, practicality, and respect for the home’s architectural heritage.
How can I find skilled contractors who specialize in renovating historic homes?
When searching for contractors skilled in historic home renovations, focus on those with a history of working on older properties. Check for expertise in preserving unique architectural details while blending in modern improvements. Take a close look at their portfolios to find projects similar to yours, and don’t hesitate to ask for references to confirm their experience. It’s also wise to work with contractors who are familiar with historic preservation guidelines and can strike a balance between updating functionality and honoring the home’s original charm.